#localhost xampp
Explore tagged Tumblr posts
Visit Tumblr Blog
Explore Tumblr blogs with no restrictions, modern design and the best experience.
Last Seen Tumblr Blogs


Fun Fact
Tumblr Inc. is using 66 technologies for its website.
Text
youtube
Learn how to install WordPress on localhost in XAMPP on Windows 10/11 with this easy tutorial. Follow the step-by-step guide for a successful setup!
1 note
·
View note
Video
youtube
The ABSOLUTE BEST Way to Install WordPress on XAMPP in 8 Minutes
🎥📢 Want to set up WordPress on your own computer? Then this video is for you! 💻🔥
In this tutorial, I’ve shown how to easily install WordPress on localhost using XAMPP. Start practicing web development from the comfort of your home! 🚀
👇 Watch the video now and don’t forget to share!
1 note
·
View note
Text
How to Install WordPress Locally on Your MacBook (Easy Guide)
🚀 Exciting news for all you WordPress developers and enthusiasts! 🎉 Just published a new blog post on how to easily install WordPress locally on your MacBook! 💻 Perfect for testing themes, plugins, and building websites offline. No more messing with live servers! 🙌 This step-by-step guide walks you through the entire process, making it super simple even for beginners. Whether you're using MAMP, XAMPP, or another local development environment, this tutorial has you covered. 🤓 Check it out now and start building your WordPress projects locally! 👇 #WordPress #LocalDevelopment #MacBook #Installation #Tutorial #WebDev #MAMP #XAMPP #Localhost #PHP #MySQL #WordPressTutorial #WebDevelopment #Coding #Tech #BlogPost #NewBlog #LearnToCode #RTFM #100DaysOfRTFM #Innovation #Technology #Creativity #LocalWP #SoftwareDevelopment #DigitalStrategy #DigitalMarketing
So, you’re ready to dive into the world of WordPress development, but you don’t want to mess with a live server just yet? Great idea! Setting up WordPress locally on your MacBook is the perfect way to experiment, test themes and plugins, and build your website in a safe environment. This guide will walk you through the process step-by-step. Why Install WordPress Locally? Before we jump in, let’s…
#Installation#Local Development#Localhost#MacBook#MAMP#MySQL#PHP#Tutorial#Web Development#WordPress#XAMPP
0 notes
Text
Joomla 4 installation on Localhost
This is Joomla 4 Installation and setup on Windows 10. You will learn how you can install Joomla Latest version 4.0.2 in localhost XAMPP. To install Joomla 4 you need PHP version 7.4+ and MySQL version 5.6+ if you have any issue with the installation or any other please comment, and I will try to help you.
youtube
View On WordPress
#how to install joomla#how to install joomla 4 in window 10#How to install joomla in localhost using xampp#how to install joomla in xampp#how to install joomla in xampp step by step#how to install joomla on windows 10#how to install joomla template on localhost#joomla 3 10 download#joomla 4#joomla 4 beta 8#Joomla 4 installations#joomla 4 templates#joomla overview#joomla review#JoomTech Solutions#Youtube
0 notes
Text
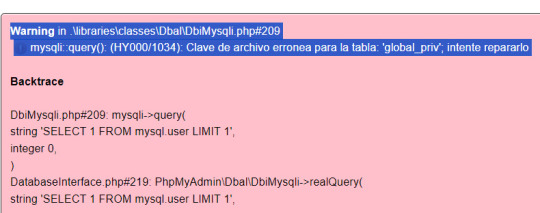
Como reparar el error de MySQL en XAMPP
Si estas trabajando en el desarrollo de un sitio web o aplicación con un servidor de base de datos, lo mas factible, es que estés usando alguna paquete de desarrollo al estilo XAMPP. Este paquete incluye un servidor web, uno de bases de datos y los interpretes de lenguajes PHP y Perl. Hace poco tiempo, comenzó a aparecer un mensaje de error del gestor de bases de datos incluido por defecto en…
View On WordPress
0 notes
Text
For some reference on how I did it!
https://m.mediawiki.org/wiki/Manual:Installing_MediaWiki
The above was the main tutorial I used! The main parts for me was installing XAMPP, using Apache through the XAMPP console, and then separately using MariaDB *instead of* MySQL (which is in the XAMPP console). When creating the database in MariaDB, use the collation "utf8mb4_unicode_520_ci" instead.
https://m.mediawiki.org/wiki/Manual:Installing_MediaWiki_on_XAMPP
https://m.mediawiki.org/wiki/Manual:MariaDB
tutorial for XAMPP setup and ImageMagick [note that this uses XAMPP's MySQL, my process used MariaDB]:
https://youtube.com/watch?v=PoL_XxhsYRo
For APCu (which is related to caching and speeding up browsing), in XAMPP's php.ini file you'll want to make sure to have 'extension=apcu'. The below page was a big help on making sure you're using the right version, especially the top comment. that phpinfo() command part just literally make a text file with it, save as .php file through like notepad or notepad++, put it in your main folder for your wiki, open localhost to it
https://www.php.net/manual/en/book.apcu.php
Essentially when you get to the "installing the wiki" step, I tried to have ImageMagick and APCu ready and set up and showing that they're installed. I also looked into installing diff3 and File, but you do it after installation of your server when the LocalSettings.php has been created. Info is for some reason
https://m.mediawiki.org/wiki/Manual:Installing_MediaWiki_on_Windows_Server_2008_R2#GNU_diff3_Installation_.28Optional.29
This was a two-day project for me so don't fret if it takes a while to figure out. I hope though that this collection of links expedites the "googling around figuring out what the fuck anything is" stage.
There are many cool extensions you can do with MediaWiki and you can create a forum or a blog on it or just use it for whatever! I just think it feels so cool. Look around at other wikis to see how their CSS is done
MediaWiki:Common.css
https://m.mediawiki.org/wiki/Manual:CSS
https://en.touhouwiki.net/wiki/Touhou_Wiki
https://en.touhouwiki.net/wiki/MediaWiki:Common.css
https://wiki.puella-magi.net/Main_Page
https://wiki.puella-magi.net/MediaWiki:Common.css
YIPPEE I figured out how to host a WIKI on my COMPUTER with PHP and SQL!!!! I am gonna put so much world-building lore in this thing once I figure out some CSS
I can't say anything about the project but aaaaah I am. Excited. I have been wiggling this story concept in my head for like 4 years and am ready to spew them onto my computer much like raw unprocessed ore
#wiki#website#localhost#computer#php#sql#mysql#mariadb#xampp#mediawiki#Wikipedia#gnu#imagemagick#apcu#kassandra rambles#kassandra writes#css#open source
45 notes
·
View notes
Text
Dairy Farm Shop Management System Using PHP and MySQL

The Dairy Farm Shop Management System (DFSMS) is a web based application that can be accessed over the web. This system can be used to automate the workflow of dairy shop and their invoices.
The project has been planned to be having the view of distributed architecture, with centralized storage of the database. The application for the storage of the data has been planned. Using the constructs of MySQL Server and all the user interfaces has been designed using the PHP technologies. The database connectivity is planned using the “MySQL Connection” methodology. The standards of security and data protective mechanism have been given a big choice for proper usage. The application takes care of different modules and their associated reports, which are produced as per the applicable strategies and standards that are put forwarded by the administrative staff.
Click: https://phpgurukul.com/dairy-farm-shop-management-system-using-php-and-mysql/
Project Modules
DFSMS is a web-based application which manages the products of dairy shop. It has one module i.e. admin who manages all the functions of the dairy shop.
Admin Features :
Dashboard: In this section, admin can see all detail in brief like Total listed categories, companies, products and also see the sales.
Category: In this section, admin can add new categories and edit, delete old categories.
Company: In this section, admin can add new companies and edit, delete old companies.
Product: In this section, admin can add new products and edit old products.
Search: In this section, admin can search for a product then add the product into the cart and generate invoice /receipt.
Invoices: In this section, admin can view all generated invoices/receipts.
Reports: In this section, admin can generate two reports, one is B/w date and another one is for sales.
Admin can also update his profile, change the password and recover the password.
How to run the Dairy Farm Shop Management System Project (DFSMS)
1. Download the zip file
2. Extract the file and copy dfsms folder
3.Paste inside root directory(for xampp xampp/htdocs, for wamp wamp/www, for lamp var/www/html)
4. Open PHPMyAdmin (http://localhost/phpmyadmin)
5. Create a database with name dfsms
6. Import dfsms.sql file(given inside the zip package in SQL file folder)
7.Run the script http://localhost/dfsms
*********************Admin Credential*********************
Username: admin Password: Test@123
PHP Gurukul
Welcome to PHPGurukul. We are a web development team striving our best to provide you with an unusual experience with PHP. Some technologies never fade, and PHP is one of them. From the time it has been introduced, the demand for PHP Projects and PHP developers is growing since 1994. We are here to make your PHP journey more exciting and useful.
Email: [email protected] Website : https://phpgurukul.com
0 notes
Text
Complete PHP Tutorial: Learn PHP from Scratch in 7 Days
Are you looking to learn backend web development and build dynamic websites with real functionality? You’re in the right place. Welcome to the Complete PHP Tutorial: Learn PHP from Scratch in 7 Days — a practical, beginner-friendly guide designed to help you master the fundamentals of PHP in just one week.
PHP, or Hypertext Preprocessor, is one of the most widely used server-side scripting languages on the web. It powers everything from small blogs to large-scale websites like Facebook and WordPress. Learning PHP opens up the door to back-end development, content management systems, and full-stack programming. Whether you're a complete beginner or have some experience with HTML/CSS, this tutorial is structured to help you learn PHP step by step with real-world examples.
Why Learn PHP?
Before diving into the tutorial, let’s understand why PHP is still relevant and worth learning in 2025:
Beginner-friendly: Easy syntax and wide support.
Open-source: Free to use with strong community support.
Cross-platform: Runs on Windows, macOS, Linux, and integrates with most servers.
Database integration: Works seamlessly with MySQL and other databases.
In-demand: Still heavily used in CMS platforms like WordPress, Joomla, and Drupal.
If you want to build contact forms, login systems, e-commerce platforms, or data-driven applications, PHP is a great place to start.
Day-by-Day Breakdown: Learn PHP from Scratch in 7 Days
Day 1: Introduction to PHP & Setup
Start by setting up your environment:
Install XAMPP or MAMP to create a local server.
Create your first .php file.
Learn how to embed PHP inside HTML.
Example:
<?php echo "Hello, PHP!"; ?>
What you’ll learn:
How PHP works on the server
Running PHP in your browser
Basic syntax and echo statement
Day 2: Variables, Data Types & Constants
Dive into PHP variables and data types:
$name = "John"; $age = 25; $is_student = true;
Key concepts:
Variable declaration and naming
Data types: String, Integer, Float, Boolean, Array
Constants and predefined variables ($_SERVER, $_GET, $_POST)
Day 3: Operators, Conditions & Control Flow
Learn how to make decisions in PHP:
if ($age > 18) { echo "You are an adult."; } else { echo "You are underage."; }
Topics covered:
Arithmetic, comparison, and logical operators
If-else, switch-case
Nesting conditions and best practices
Day 4: Loops and Arrays
Understand loops to perform repetitive tasks:
$fruits = ["Apple", "Banana", "Cherry"]; foreach ($fruits as $fruit) { echo $fruit. "<br>"; }
Learn about:
for, while, do...while, and foreach loops
Arrays: indexed, associative, and multidimensional
Array functions (count(), array_push(), etc.)
Day 5: Functions & Form Handling
Start writing reusable code and learn how to process user input from forms:
function greet($name) { return "Hello, $name!"; }
Skills you gain:
Defining and calling functions
Passing parameters and returning values
Handling HTML form data with $_POST and $_GET
Form validation and basic security tips
Day 6: Working with Files & Sessions
Build applications that remember users and work with files:
session_start(); $_SESSION["username"] = "admin";
Topics included:
File handling (fopen, fwrite, fread, etc.)
Reading and writing text files
Sessions and cookies
Login system basics using session variables
Day 7: PHP & MySQL – Database Connectivity
On the final day, you’ll connect PHP to a database and build a mini CRUD app:
$conn = new mysqli("localhost", "root", "", "mydatabase");
Learn how to:
Connect PHP to a MySQL database
Create and execute SQL queries
Insert, read, update, and delete (CRUD operations)
Display database data in HTML tables
Bonus Tips for Mastering PHP
Practice by building mini-projects (login form, guest book, blog)
Read official documentation at php.net
Use tools like phpMyAdmin to manage databases visually
Try MVC frameworks like Laravel or CodeIgniter once you're confident with core PHP
What You’ll Be Able to Build After This PHP Tutorial
After following this 7-day PHP tutorial, you’ll be able to:
Create dynamic web pages
Handle form submissions
Work with databases
Manage sessions and users
Understand the logic behind content management systems (CMS)
This gives you the foundation to become a full-stack developer, or even specialize in backend development using PHP and MySQL.
Final Thoughts
Learning PHP doesn’t have to be difficult or time-consuming. With the Complete PHP Tutorial: Learn PHP from Scratch in 7 Days, you’re taking a focused, structured path toward web development success. You’ll learn all the core concepts through clear explanations and hands-on examples that prepare you for real-world projects.
Whether you’re a student, freelancer, or aspiring developer, PHP remains a powerful and valuable skill to add to your web development toolkit.
So open up your code editor, start typing your first <?php ... ?> block, and begin your journey to building dynamic, powerful web applications — one day at a time.

0 notes
Text
What are the steps to install OpenEMR for a clinic?
Introduction
Healthcare practitioners use OpenEMR as a strong open-source application that functions as an Electronic Medical Records (EMR) system together with practice management capabilities. The clinic needs to follow several vital steps to install OpenEMR, which we will describe in the following section. As a step-by-step guide, it will provide you with a straightforward path to set up OpenEMR while maximizing its available features.
Step 1: Download and Extract OpenEMR
1.Download OpenEMR
Users should retrieve the most up-to-date version of OpenEMR (openemr-7.0.2.zip) through Source Forge from the OpenEMR website.
You should enable your browser to allow downloading files without interruption.
2.Extract the OpenEMR Archive
Right-click and open the downloaded zip file through the Properties dialogue box available on your operating system.
The file extraction process depends on selecting "Unblock" in the Windows Properties box in order to prevent file blocking.
Extract the zip file to a folder on your computer (e.g., C:\OpenEMR).
3.Rename the Directory (Optional)
You should rename the directory to openemr if you wish to simplify its name.
Step 2: Download and Install XAMPP
1.Download XAMPP
Users should navigate to the Apache Friends official website and retrieve the newest version of Windows XAMPP from this page.
2.Install XAMPP
Launch the XAMPP installer through the download and execute the built-in instructions to perform the setup.
The default installation settings should remain selected unless you require custom modifications.
Step 3: Move OpenEMR to the XAMPP Directory
You need to place OpenEMR files at the XAMPP home directory.
1.Navigate to the XAMPP Directory
The XAMPP is typically located at C:\xampp\htdocs.
2.Move OpenEMR Files
After extracting the OpenEMR folder, you should cut it before placing it inside XAMPP's htdocs directory.
The openemr directory should be located at C:\xampp\htdocs\openemr.
Step 4: Configure XAMPP
1.Start XAMPP Services
Users should start the XAMPP Control Panel to begin the Apache and MySQL services.
2.Verify Services
The services must operate without producing any errors.
Step 5: OpenEMR Setup via Web GUI
Users can establish OpenEMR through the web.
1.Access OpenEMR Setup
You should access OpenEMR through the web browser by going to http://localhost/openemr.
2.Follow Setup Instructions
Multiple steps of the setup process installation include the creation of a new database and configuration tasks.
Check all file system permissions for correctness before continuing forward.
3.Create Database
When prompted, you will decide to either establish a new database or pick one from the existing collection.
Perform the necessary actions using the instructions provided by the interface.
4.Finalize Configuration
You must finish the setup operations by creating your first login details, including username and password.
Step 6: Clinic Setup
1.Enter Global Settings
Users should configure the application settings of OpenEMR through these steps to establish the interface theme and date/time presentation.
2.Enter Facility-Specific Settings
During setup, users must provide practice and business identifiers together with tax information and insurance numbers.
3.Create User Accounts
All users accessing OpenEMR need to receive accounts during the setup process.
4.Enter Contact Information
The user can add their contact information and business account contact details.
5.Practice Settings
Configure pharmacy and insurance company information, along with accepted document formats.
Step 7: External Data Loads
1.Load Codesets
The implementation of ICD10, RXNORM, and SNOMED and CQM_VALUSET codesets through import processes will enhance the clinical documentation system.
2.Calendar Configuration
The system requires configuration to define appointment types together with the providers' planned availability times.
Step 8: Useful Configurations
1.Customize Templates
Tailor notes templates to your practice’s needs.
2.Integrate with Other Systems
OpenEMR should be connected to lab systems, billing software, and telehealth platforms.
Troubleshooting Tips
The Apache server must possess correct permissions that allow file reading and writing operations in the OpenEMR directory.
Check MySQL settings to resolve any database connection issues by verifying proper database configuration.
Service disruptions of XAMPP require users to reset both Apache and MySQL components.
Real-World Examples and Case Studies
The clinic based in Vermont utilized OpenEMR Cloud on AWS, which resulted in a 70% reduction in server maintenance expenses while also enabling better scalability during busy patient periods.
A Texas-based large hospital decided to run OpenEMR on-premises for customized data security which delivered smooth integration with their hospital infrastructure.
Conclusion
To implement OpenEMR at a clinic, administrators need to follow multiple steps that start with software download and then proceed through configuration and clinic-specific setup. OpenEMR users can achieve operational streamlining and patient care improvement while maintaining regulatory standards through their robust features and by following the specified guidelines.
FAQs
Q1: What are the system requirements for installing OpenEMR on Windows?
Your system requirements for OpenEMR installation are Windows Server 2012 and later versions or Windows 10/11 together with XAMPP or WampServer and Apache HTTP Server running PHP 7.4 or higher with essential extensions alongside MySQL version 5.6 or above.
Q2: How do I troubleshoot common issues during OpenEMR installation?
Verify the system permissions while also checking for database configuration accuracy before restarting XAMPP service operations.
Q3: Can I use OpenEMR on other platforms besides Windows?
The OpenEMR system functions on Linux and macOS operating systems with server setups that include XAMPP and LAMP.
0 notes
Text
How to Develop a Website Using PHP
How to Develop a Website Using PHP
In today's digital era, websites play a crucial role in business growth and online presence. One of the most widely used server-side scripting languages for web development is PHP (Hypertext Preprocessor). It is open-source, easy to learn, and widely supported by web servers and databases. This guide will walk you through the step-by-step process of developing a website using PHP.

Why Choose PHP for Web Development?
Before diving into the development process, let’s explore some key reasons why PHP is a great choice for website development:
1. Open-Source: PHP is free to use, making it cost-effective for developers.
2. Cross-Platform Compatibility: Runs on Windows, Linux, and macOS without compatibility issues.
3. Database Support: Easily integrates with MySQL, PostgreSQL, and other databases.
4. Scalability: Suitable for both small websites and large-scale web applications.
5. Large Community Support: Extensive documentation and active developer communities for troubleshooting and learning.
Prerequisites for PHP Web Development
To develop a website using PHP, you need the following tools:
1. Text Editor or IDE: VS Code, Sublime Text, or PHPStorm.
2. Local Server: XAMPP, WAMP, or MAMP for running PHP scripts.
3. Database System: MySQL or PostgreSQL for data storage.
4. Web Browser: Chrome, Firefox, or Edge for testing the website.
Step-by-Step Guide to Developing a Website Using PHP
1. Setting Up Your Development Environment
To begin developing a PHP website, follow these steps:
· Install XAMPP (or WAMP/MAMP) to create a local server.
· Using the XAMPP Control Panel, launch Apache and MySQL.
· Navigate to htdocs in the XAMPP directory to store PHP project files.
2. Creating the Project Structure
Organizing your files properly enhances maintainability. A typical PHP project structure:
project-folder/
│-- index.php
│-- config.php
│-- assets/
│ ├── css/
│ ├── js/
│ ├── images/
│-- includes/
│ ├── header.php
│ ├── footer.php
│-- pages/
│ ├── about.php
│ ├── contact.php
│-- database/
│ ├── db_connect.php
3. Writing Your First PHP Script
Create an index.php file and add the following code:
<?php
echo "Welcome to My PHP Website!";
?>
Save the file and access it in the browser by navigating to http://localhost/project-folder/.
4. Connecting PHP with MySQL Database
To manage dynamic content, connect PHP with a MySQL database.
Create a Database
1. Open phpMyAdmin from XAMPP.
2. Create a new database, e.g., my_website.
3. Add a users table with fields id, name, email, and password.
Database Connection Code (db_connect.php)
<?php
$servername = "localhost";
$username = "root";
$password = "";
dbname = "my_website";
$conn = new mysqli($servername, $username, $password, $dbname);
if ($conn->connect_error) {
die("Connection failed: " . $conn->connect_error);
}
?>
5. Creating a User Registration System
A simple user registration form using PHP and MySQL.
Registration Form (register.php)
<form method="POST" action="register.php">
<input type="text" name="name" placeholder="Full Name" required>
<input type="email" name="email" placeholder="Email" required>
<input type="password" name="password" placeholder="Password" required>
<button type="submit" name="register">Register</button>
</form>
Handling User Registration (register.php)
<?php
include 'database/db_connect.php';
if(isset($_POST['register'])) {
$name = $_POST['name'];
$email = $_POST['email'];
$password = password_hash($_POST['password'], PASSWORD_BCRYPT);
$sql = "INSERT INTO users (name, email, password) VALUES ('$name', '$email', '$password')";
if ($conn->query($sql) === TRUE) {
echo "Registration successful!";
} else {
echo "Error: " . $conn->error;
}
}
?>
6. Implementing User Login System
Login Form (login.php)
<form method="POST" action="login.php">
<input type="email" name="email" placeholder="Email" required>
<input type="password" name="password" placeholder="Password" required>
<button type="submit" name="login">Login</button>
</form>
Handling Login Authentication (login.php)
<?php
session_start();
include 'database/db_connect.php';
if(isset($_POST['login'])) {
$email = $_POST['email'];
$password = $_POST['password'];
$result = $conn->query("SELECT * FROM users WHERE email='$email'");
$user = $result->fetch_assoc();
if(password_verify($password, $user['password'])) {
$_SESSION['user'] = $user;
echo "Login successful!";
} else {
echo "Invalid credentials!";
}
}
?>

7. Adding Navigation and Styling
· Use Bootstrap or CSS frameworks to improve UI.
· Include a header.php and footer.php for better navigation.
8. Deploying the PHP Website
Once development is complete, deploy your PHP website using:
· Shared Hosting with cPanel for easy management.
· Cloud Hosting (AWS, DigitalOcean) for high performance.
· Domain & SSL Certificate for a secure and professional website.
Conclusion
Developing a website using PHP is an efficient way to create dynamic and interactive websites. By following this step-by-step guide, you can build a PHP-based website from scratch, implement database interactions, user authentication, and deploy your project successfully. Start your PHP development journey today and create powerful web applications!
#web development#seo services#web designing#social media marketing#graphic design#digital marketing#digitalmarketing#marketing#digitalindia#seo
1 note
·
View note
Text
How to Install XAMPP for Windows 10 - XAMPP WordPress For Beginners
To install XAMPP on Windows 10 and set it up for WordPress, follow these steps:
Step 1: Download XAMPP
Go to the official XAMPP website.
Click on the "XAMPP for Windows" button.
Once the installer is downloaded, locate the .exe file (usually in the Downloads folder).
Step 2: Install XAMPP
Double-click the .exe file to start the installation process.
Choose the components you want to install. For WordPress, you need at least Apache, MySQL, and PHP. These are selected by default, so you can leave them as is.
Choose the installation folder (default is usually fine).
Click "Next" and follow the prompts.
During installation, the installer may ask if you want to start the XAMPP Control Panel. Leave it checked and click "Finish."
Step 3: Start Apache and MySQL
Open the XAMPP Control Panel (it should have opened automatically, or you can search for it in the Start menu).
Click the "Start" button next to Apache (this will run the web server).
Click the "Start" button next to MySQL (this will start the database server).
Make sure both Apache and MySQL show "Running" in green.
Step 4: Install WordPress
Download the latest version of WordPress from the official WordPress website.
Extract the WordPress ZIP file.
Move the extracted folder (the WordPress folder) into the htdocs folder of your XAMPP installation (usually located at C:\xampp\htdocs).
Step 5: Create a Database for WordPress
Open your browser and go to http://localhost/phpmyadmin/.
In the phpMyAdmin dashboard, click on "Databases."
Create a new database for WordPress. Give it a name (e.g., wordpress_db) and click "Create."
Step 6: Configure WordPress
Open your browser and go to http://localhost/wordpress (or the folder name you chose).
The WordPress installation screen should appear.
Select your language and click "Continue."
On the next screen, enter your database details:
Database Name: The name you created (e.g., wordpress_db).
Username: root (default for XAMPP).
Password: Leave this blank (default for XAMPP).
Database Host: localhost (default).
Table Prefix: Leave as wp_ unless you want to change it.
Click Submit and then Run the Install.
Step 7: Complete the WordPress Setup
Fill in the site details (site title, admin username, password, and email).
Click "Install WordPress."
Once the installation is complete, you’ll see a success message. You can now log in to your WordPress dashboard at http://localhost/wordpress/wp-admin.
Final Notes
To stop your server, go to the XAMPP Control Panel and click "Stop" for Apache and MySQL.
If you need to make your local WordPress site public, you'll have to configure port forwarding or use a tool like Local by Flywheel or XAMPP for public access.
#installxampp#xamppforbeginners#xamppwindows10#wordpressinstallation#localserversetup#runwordpresslocally#xamppwordpress#webdevelopment#phpdevelopment#wordpressforbeginners#tutorial2025#localwordpress#xamppsetup#installingwordpress#wordpresssetup#beginnerfriendly#xamppguide#developmenttutorial#learnwordpress#wordpresslocally
0 notes
Text
How to Move Your WordPress Site from Localhost to a Live Server
Developing a WordPress site on localhost is a great way to build and test your website in a controlled environment. However, the real challenge arises when it's time to move the site from your local server to a live hosting environment. If not done correctly, you could encounter broken links, missing images, or even database errors.
In this blog, we'll guide you through a step-by-step process to successfully move your WordPress site from localhost to a live server.

Step 1: Choose the Right Hosting Provider
Your first step is to select a reliable web hosting provider that meets your website’s needs. Look for:
Server Speed: Fast servers for better performance.
Uptime Guarantee: At least 99.9% uptime to ensure availability.
Ease of Use: User-friendly dashboards and tools.
WordPress Support: Hosting optimized for WordPress websites.
Popular options include Bluehost, SiteGround, and WP Engine.
Step 2: Export Your Local WordPress Database
The database is the backbone of your WordPress site. To export it:
Open phpMyAdmin on your local server (e.g., XAMPP or WAMP).
Select your WordPress database.
Click on the Export tab and choose the Quick Export method.
Save the .sql file to your computer.
Step 3: Upload Your WordPress Files to the Live Server
To move your files:
Compress Your WordPress Folder: Zip your local WordPress installation folder.
Access Your Hosting Account: Use a file manager or an FTP client like FileZilla.
Upload the Files: Transfer the zipped folder to your hosting server's root directory (usually public_html).
Unzip the Folder: Extract the files once uploaded.
Step 4: Create a Database on the Live Server
Now, set up a new database on your live hosting server:
Log in to your hosting control panel (e.g., cPanel).
Navigate to the MySQL Databases section.
Create a new database, database user, and password.
Assign the user to the database with full privileges.
Step 5: Import the Database to the Live Server
Open phpMyAdmin in your hosting control panel.
Select the new database you created.
Click the Import tab.
Choose the .sql file you exported from your localhost.
Click Go to import the database.
Step 6: Update the wp-config.php File
To connect your site to the live database:
Locate the wp-config.php file in your WordPress installation.
Open the file in a text editor.
Update the following lines: define('DB_NAME', 'your_live_database_name'); define('DB_USER', 'your_live_database_user'); define('DB_PASSWORD', 'your_live_database_password'); define('DB_HOST', 'localhost'); // Keep this unless your host specifies otherwise.
Save the file and upload it to your server via FTP.
Step 7: Update URLs in the Database
Your localhost URLs need to be replaced with your live site URLs.
Use a tool like Search Replace DB or run SQL queries in phpMyAdmin.
In phpMyAdmin, run the following query: UPDATE wp_options SET option_value = 'http://your-live-site.com' WHERE option_name = 'siteurl'; UPDATE wp_options SET option_value = 'http://your-live-site.com' WHERE option_name = 'home';
Step 8: Test Your Live Website
Once everything is uploaded and configured, check your website by entering its URL in a browser. Test for:
Broken Links: Fix them using plugins like Broken Link Checker.
Missing Images: Ensure media files were uploaded correctly.
Functionality: Verify forms, buttons, and features work as expected.
Step 9: Set Up Permalinks
To ensure proper URL structure:
Log in to your WordPress admin dashboard on the live site.
Go to Settings > Permalinks.
Choose your preferred permalink structure and click Save Changes.
Step 10: Secure Your Live Website
After migrating, secure your site to prevent vulnerabilities:
Install an SSL Certificate: Most hosting providers offer free SSL certificates.
Update Plugins and Themes: Ensure everything is up to date.
Set Up Backups: Use plugins like UpdraftPlus for regular backups.
Conclusion
Moving your WordPress site from localhost to a live server may seem daunting, but by following these steps, you can ensure a smooth and error-free migration. A successful move allows you to showcase your site to the world, engage your audience, and achieve your goals.
Start today and take your WordPress project live with confidence!
0 notes
Text
How Can I Create a Website Without a Domain Name? Here’s How!

Creating a website without a domain name is possible and can be ideal for testing or personal projects. This guide explains how to build a website without buying a domain while keeping it functional and visible on the web.
Why Create a Website Without a Domain Name?
Many people choose to skip a custom domain when
1.Use a Website Builder’s Free Subdomain
Platforms like Wix, WordPress, and Weebly offer free website creation with their subdomains. For instance, instead of “yourwebsite.com,” it might look like “yourwebsite.wixsite.com.”
Advantages:
- No need for hosting, as most builders provide free hosting for subdomains.
- Fast and easy to set up.
- Free or low-cost setup.
Disadvantages:
-Limited customization and branding.
Less professional-looking URL.
2.Utilize GitHub Pages for Coding Projects
For developers or those with coding knowledge, GitHub Pages provides a free hosting solution where your site can be accessible at "username.github.io/project."
Advantages:
-Ideal for static sites, personal projects, or portfolios.
Free SSL (secure connection).
Disadvantages:
- Requires basic coding knowledge.
- Limited to HTML, CSS, and JavaScript.
3.Free Hosting Providers with Temporary URLs
Some hosting providers like InfinityFree and 000WebHost offer free plans with temporary URLs. These temporary URLs allow you to create, test, and host sites without a purchased domain.
Advantages:
- Cost-free hosting options.
- Access to control panels for site management.
- Option to add a custom domain later.
Disadvantages:
- Advertising may be displayed.
- Limited support and resources.
4.Use a Localhost Environment for Offline Testing
For complete control over site functionality, set up a local server using software like XAMPP or Local by Flywheel to run your website offline. While this won’t make your site publicly accessible, it’s perfect for building and testing.
Advantages:
- Full control over testing without online exposure.
- No internet required for access.
- Great for testing advanced functionalities.
Disadvantages:
- Requires technical setup.
- Not accessible over the web.
Key Considerations for Websites Without a Domain Name
Creating a website without a domain can be useful but often comes with limitations. As your project grows or turns commercial, transitioning to a custom domain can increase credibility and improve search engine rankings.
Conclusion
Building a website without a domain name is a viable option, especially for beginners or those working on non-commercial projects. Free subdomains, GitHub Pages, free hosting services, and localhost environments make it easy to establish a web presence. Once ready to grow, consider registering a domain to enhance branding and professionalism.
0 notes
Text
Fixing Magento 2 Internal Server Error on Localhost | Apache Server Configuration
Sometime when we installed magento 2 in localhost. When trying to run frontend and Backend then we get the this issue Internal Server Error, that means apache server not configured properly, Then we need to configured apache 2 server configuration. It will come when using XAMPP for windows, MAMP for Macos. So we need to set apache 2 configuration in localhost. Internal Server ErrorThe server…
#Internal Server Error in magento 2?#Magento 2 after installation getting this error?#magento 2 internal server error#Please contact the server administrator#The server encountered an internal error or misconfiguration
0 notes
Text
Restaurant Table Booking System using PHP and MySQL
Restaurant Table Booking System using PHP and MySQL is a web-based application. The restaurant Table Booking system project is developed to provide service facilities to restaurants and also to the customer. Customers can reserve the table online and check the status of the reservation.
Project Modules
In this project, we use PHP and MySQL database. It has two modules i.e Admin and user.
User Module
Users can fill out the table reservation form.
User can also check the table reservation/booking status.
Click here: https://phpgurukul.com/restaurant-table-booking-system-using-php-and-mysql/
Admin Module
Secure admin/sub-admin login
Dashboard: In this section, the admin can all the brief details like total sub-admins, total bookings, new bookings, accepted bookings and rejected bookings.
Sub-Admins: In this section, Admin can create the sub-admin, delete sub-admins, edit sub-admins, and reset the passwords of sub-admins.
Tables: In this section, admin can add and delete the tables.
Bookings: In this section, the admin can view the new, accepted, rejected, and all bookings. Admin can take actions on new bookings.
B/w dates report: In this section, admin can generate the report of between two dates bookings.
Account Setting: Admin can update his profile, and change the password.
Admin can also recover the password.
Sub-Admin Module
Sub-Admin and Admin features are the same except Sub-Admin creation. Sub-Admin can’t create the Sub-Admins.
How to run the Restaurant Table Booking System (rtbs) Project
1. Download the zip file
2. Extract the file and copy rtbs folder
3.Paste inside root directory(for xampp xampp/htdocs, for wamp wamp/www, for lamp var/www/HTML)
4.Open PHPMyAdmin (http://localhost/phpmyadmin)
5. Create a database with the name rtbsdb
6. Import rtbsdb.sql file(given inside the zip package in the SQL file folder)
7. Run the script http://localhost/rtbs
Credential for Admin panel :
Username: admin Password: Test@123
PHP Gurukul
Welcome to PHPGurukul. We are a web development team striving our best to provide you with an unusual experience with PHP. Some technologies never fade, and PHP is one of them. From the time it has been introduced, the demand for PHP Projects and PHP developers is growing since 1994. We are here to make your PHP journey more exciting and useful.
Email: [email protected] Website : https://phpgurukul.com
0 notes
Text
Medical Card Generation System using PHP and MySQL

The ‘Medical Card Generations System using PHP and MySQL’ has been designed to override the problem of existing manual system. This web application is supported to eliminate and in some case reduce the hardship faced by manual system. The application is reduced as much as possible to avoid errors while entering the data. It’s also provide message while entering invalid data. No formal knowledge is required for the user to operate this system. Overall we said that ‘Medical Card Generations System’ is user friendly.
Project Modules
In ‘Medical Card Generations System’ we use PHP and MySQL Database. This project keeps the records of medical cards. ‘Medical Card Generations System’ has two module i.e. admin and user.
Admin Module
Dashboard: In this section, admin can briefly view the total medical card created in today’s, yesterday’s and in seven days, total read and unread enquiries.
Medical Card: In this section, admin can manage medical cards (add/delete/update).
Page: In this section, admin can manage about us and contact us pages.
Enquiry: In this section, admin reads the inquiries which are sent by users.
Search: In this section, admin can search a particular medical cards by reference number.
Reports of Medical Cards: In this section admin can view and check medical card details in a particular period.
Click: https://phpgurukul.com/medical-card-generation-system-using-php-and-mysql/
Admin can also update his profile, change the password and recover the password.
User Module
Home Page: User can visit home page.
Medical Card: User can view his/her medical card and take print with the help of their Reference Number.
About Us: User sees the details of .website administrator.
Contact Us: User can contact with website administrator and sent enquiry to them.
Note: In this project, the MD5 encryption method was used.
How to run the Medical Card Generation System Project using PHP and MySQL
1. Download the project zip file
2. Extract the file and copy mcgs folder
3.Paste inside root directory(for xampp xampp/htdocs, for wamp wamp/www, for lamp var/www/Html)
4.Open PHPMyAdmin (http://localhost/phpmyadmin)
5. Create a database with the name mgsdb
6. Import mgsdb.sql file(given inside the zip package in SQL file folder)
7. Run the script http://localhost/mcgs
Click: https://phpgurukul.com/medical-card-generation-system-using-php-and-mysql/
1 note
·
View note